AudioFetch Express Quick Installation Tips
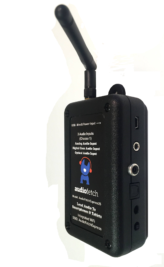
The AudioFetch Express unit can be connected in several different ways. Please see the categories below and click the appropriate column to review the quick installation tips.
ACCESS POINT
The AudioFetch Express will act as your wireless network with or without internet.
WIRELESS CLIENT
Wirelessly connect AudioFetch Express to an existing WiFi network w/internet connection.
HARDWIRED
Plug the AudioFetch Express into an existing WiFi network w/internet connection.
ACCESS POINT - Without Internet
The AudioFetch Express will act as the wireless network and broadcast the audio directly from the Express. Mobile devices receive audio by connecting to the AudioFetch Express network. If programming instructions were not given prior to shipping, the unit will ship in this mode as a default.
STEP 1
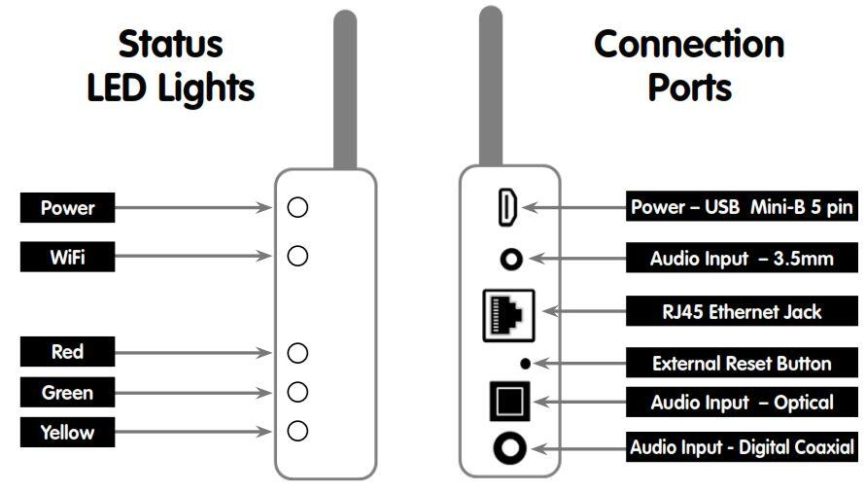
POWER
Plug the mini USB cable into the AudioFetch Express unit, the other end into the USB jack on your device (TV for example) or use the USB power adapter (if ordered) to plug into an outlet.
STEP 2
AUDIO
The AudioFetch Express unit has 3 options for audio. Select the audio input of your choice and plug into the audio output on your device.
STEP 3
ACCESS DOGHOUSE
Go to www.audiofetch.com/doghouse/ to download the Doghouse on your phone or computer. The username is ADMIN and the password is admin.
STEP 4
NETWORK SET UP
From the Doghouse Welcome page click on the network setup tab. Select “Access
Point” from the Operating Mode dropdown list.
STEP 5
ACCESS POINT MODE
In Access Point mode your Express unit will automatically name the network AudioFetchExpress with no password,
You can change the WiFi name and add a
password if you wish in the Access Point Settings. At the bottom of the page click Save Settings. When the warning
message pops up click OK.
STATUS LIGHTS
If the unit is connected properly, the power and status lights should be GREEN and the WiFi status light should be a solid or blinking YELLOW.
ACCESS POINT - With Internet
The AudioFetch Express will act as the wireless network and broadcast the audio directly from the Express. Mobile devices receive audio by connecting to the AudioFetch Express network.The Express will act as your wireless network but connects to your network for internet.
STEP 1
POWER
Plug the mini USB cable into the AudioFetch Express unit, the other end into the USB jack on your device (TV for example) or use the USB power adapter (if ordered) to plug into an outlet.
STEP 2
AUDIO
The AudioFetch Express unit has 3 options for audio. Select the audio input of your choice and plug into the audio output on your device.
STEP 3
ACCESS DOGHOUSE
Go to www.audiofetch.com/doghouse/ to download the Doghouse on your phone or computer. The username is ADMIN and the password is admin.
STEP 4
NETWORK SET UP
From the Doghouse Welcome page click on the network setup tab. Select “Access Point & Wireless Internet” from the Operating Mode dropdown list.
STEP 5
ACCESS POINT & WIRELESS INTERNET MODE
In Access Point & Wireless Internet mode your Express unit will automatically name the network AudioFetch Express with no password, You can change the WiFi name and add a password if you wish in the Access Point Settings. At the bottom of the page click Save Settings. When the warning message pops up click OK.
STEP 6
CLIENT MODE SETTING FOR INTERNET
In the Client Mode Settings: Enter the WiFi SSID of the network that you want to connect to for Internet.
WIRELESS CLIENT
The AudioFetch Express connects wirelessly to a pre-existing wired network. Mobile devices receive audio by connecting to the pre-existing WiFi network. The pre-existing WiFi network provides internet access.
STEP 1
POWER
Plug the mini USB cable into the AudioFetch Express unit, the other end into the USB jack on your device (TV for example) or use the USB power adapter (if ordered) to plug into an outlet.
STEP 2
AUDIO
The AudioFetch Express unit has 3 options for audio. Select the audio input of your choice and plug into the audio output on your device.
STEP 3
ACCESS DOGHOUSE
Go to www.audiofetch.com/doghouse/ to download the Doghouse on your phone or computer. The username is ADMIN and the password is admin.
STEP 4
NETWORK SET UP
From the Doghouse Welcome page click on the network setup tab. Select “Wireless Client” from the Operating Mode dropdown list.
STEP 5
WIRELESS CLIENT MODE
In the Client Mode Settings: Enter the WiFi SSID of the network that you want to connect to.
STEP 6
WIRELESS CLIENT MODE
Select the encryption method of this network (usually WPA2-PSK). Enter your WiFi password – MUST BE EXACT.
HARDWIRED
The AudioFetch Express connects to a pre-existing wired network via its Ethernet connector. Mobile devices receive audio by connecting to the pre-existing WiFi network. The pre-existing WiFi network provides internet access.
STEP 1
POWER
Plug the mini USB cable into the AudioFetch Express unit, the other end into the USB jack on your device (TV for example) or use the USB power adapter (if ordered) to plug into an outlet.
STEP 2
AUDIO
The AudioFetch Express unit has 3 options for audio. Select the audio input of your choice and plug into the audio output on your device.
STEP 3
PRE-PROGRAMMED PRIOR TO SHIPPING
Pre-programmed - If we pre-configured your unit prior to shipping, plug the Ethernet cable into the AFE unit, the other end into an available port on the router. If the unit is connected properly, the power light should be GREEN.
STEP 4
NOT PRE-PROGRAMMED PRIOR TO SHIPPING
If we did not pre-configure the unit prior to shipping, go to www.audiofetch.com/doghouse/ to download the Doghouse on your phone or computer. The username is ADMIN and the password is admin.
STEP 5
NOT PRE-PROGRAMMED PRIOR TO SHIPPING
Unplug the ethernet cable from the router if connected. From the Doghouse Welcome page click on the network setup tab. Select “Wired Only” from the Operating Mode dropdown list.
Click save and wait 30 seconds to reset. Plug the ethernet cable into the AudioFetch device and the router.
STATUS LIGHTS
If the unit is connected properly, the power light should be GREEN. The yellow status light is disabled in hardwired mode.
WIRELESS CLIENT- GUEST NETWORK
If you would rather connect the AudioFetch Express to your GUEST NETWORK, please follow the tips below. Access to your network is required.
- You will need to tell the router to forward that connection (port forward) to the guest network.
- You will need to make sure the AudioFetch Hardware is publicly discoverable on the guest network.
- You may need to use the WiFi and AFE MAC. The addresses are printed on the outside of the box for your convenience.
- Keep in mind that the AudioFetch Express is two separate devices on your network.